About ServiceNow
ServiceNow is an IT service management (ITSM) platform that manages tickets, incidents, change requests, problems, and the service catalog. Connecting ServiceNow to Serval enables native bidirectional ticket sync, service-catalog import and ordering, knowledge-base sync (with optional mirroring of articles into Serval’s native knowledge base), and workflow automation across incidents, problems, changes, and HR cases. Serval connects to a single ServiceNow instance using either OAuth 2.0 (client credentials) - the default and recommended option - or HTTP Basic authentication, and acts as a dedicated integration service account. Authentication: OAuth 2.0 (client credentials), or Basic auth Data sync: Bidirectional. Serval polls ServiceNow for ticket and comment updates (with an optional Business Rule webhook for near-real-time comment sync), keeps groups, roles, departments, companies, locations, and cost centers current with scheduled background syncs, can mirror synced knowledge articles into a read-only native Serval knowledge base, and writes back via the Table, Service Catalog, and Change Management REST APIs on demand when workflows run. Sync frequency is admin-configurable per sync.What the ServiceNow integration enables
| Capability | Description |
|---|---|
| Ticket sync | Native bidirectional sync between Serval tickets and ServiceNow incidents, catalog requested items, and HR cases - including comments and work notes. Serval formatting is converted to clean plain text on the way in. |
| Service catalog import | Import ServiceNow catalog items so employees can order them through Serval - as a confirmed form, a pure conversation, or a link back to ServiceNow - with reference data, access rules, and source-system popularity carried over. |
| Improve with Catalyst | Hand any imported catalog item to Catalyst, which redesigns the ITSM form as a conversational Serval experience and submits the request back to ServiceNow. |
| Knowledge base | Sync ServiceNow knowledge articles into Serval so the AI agent can answer from your documented guidance - and optionally mirror them into a read-only native Serval knowledge base. |
| Workflow automation | Build workflows that create and update incidents, problems, and change requests, including approvals and HR cases. |
| Access profiles and resource sync | Sync ServiceNow groups, roles, departments, companies, locations, and cost centers, and provision or deprovision group and role membership for access control. |
| User criteria import | Import ServiceNow user criteria as Serval access profiles so the same people who can request an item in ServiceNow can request it in Serval. |
| Configurable sync settings | Set per-sync frequency (hourly through weekly, or automatic) and an optional ServiceNow encoded-query filter that scopes which catalog items are imported. |
| Real-time comment sync (optional) | A single ServiceNow Business Rule pushes new comments to Serval for near-instant delivery instead of waiting for the next poll. |
| Live agent handoff (optional) | Hand a conversation off to a human ServiceNow agent through Virtual Agent Bot-to-Bot and bridge the agent’s replies back into the Serval ticket. |
Catalog import
Each catalog item is imported in one of three modes, chosen with the Collect inputs as control (and the split Import button) on the catalog import page:| Mode | What the employee experiences |
|---|---|
| Form | ”The agent shows a form to confirm the fields before submitting.” |
| Chat | ”The agent gathers what’s needed conversationally, then submits - no form.” |
| Link | ”The agent sends a link to complete the request in the external system.” |
Improve with Catalyst
Every imported catalog item has an Improve with Catalyst action. It launches a Catalyst session pre-loaded with the item’s full captured understanding - variables, client scripts, UI policies, script includes, user criteria, and the imported workflow as a starting point - plus a built-in skill that reimagines the ITSM form as a conversational Serval experience: one orchestrating skill that asks only what the employee must actually decide, small collection workflows per branch, and a submit workflow that posts the request back to ServiceNow and links the resulting requested item to the ticket. There are two entry points: for natively importable items (“Turn this form into a conversation”), and for items too complex to import, where Catalyst redesigns around the client scripts and UI policies that block native import. Resources Catalyst builds stay attached to the catalog item under a Built with Catalyst list (with Skill/Workflow badges and an Unlink action), even after the session ends. This is the recommended path for items that were flagged link-only.Importing user criteria as access profiles
The User Criteria tab in the catalog import area imports ServiceNow user criteria as Serval access profiles. Pick a ServiceNow connection, click Sync user criteria to pull criteria from ServiceNow (progress is live-polled, and failures show error details with copyable run identifiers), then review each criterion and choose Import as access profile. The detail panel for each criterion shows:- Who it matches - groups, roles, user attribute conditions (attribute criteria such as department or location map to Serval access-profile attribute conditions), and individual users.
- What it makes requestable - the catalog items the criterion gates, including whether each link is an allow (“Available”) or deny (“Not available”) relationship.
- Proposed access profile - a preview of the Serval equivalent before you import.
Mirroring knowledge articles into Serval
Knowledge sync can do more than index articles for search: once syncing is enabled for a knowledge source, the source’s settings panel shows an Import to Serval Knowledge Base toggle (off by default). Its help text reads: “When enabled, synced articles from ServiceNow are also written into a Serval native knowledge base. Disable to stop syncing without deleting already-imported pages.” When enabled:- Mirrored knowledge bases appear in the Knowledge Bases sidebar under an External Connections section.
- Mirrored documents are sync-locked and read-only, with a banner - “This document is synced from ServiceNow and is read-only.” - and a View in ServiceNow link.
- Article HTML is converted to native editor blocks (tables, lists, and headings are supported), and the folder hierarchy from ServiceNow is preserved.
- Re-syncs update content in place and record version history.
- Clicking a knowledge item reference offers a destination choice: Open in Serval or Open in ServiceNow.
Sync settings: frequency and catalog filter
A Sync settings dialog - reachable from the app instance’s Workflow Sync settings and from the catalog import page - exposes two controls for catalog sync:- Catalog filter - an optional ServiceNow encoded query (for example
category=hardware^active=true). Only matching catalog items are imported; leaving it blank imports everything. The filter is combined (AND) with the standard active-items filter. This field appears only for integrations that support it - currently ServiceNow. - Sync frequency - Automatic (recommended, the default), Every hour, Every 6 hours, Every 12 hours, Once a day, or Once a week.
- Unset means the platform default: catalog sync fan-out runs every 30 minutes for ServiceNow, and entity ingestion ticks every 4 hours.
- A configured interval is a floor, not an exact cadence - scheduled ticks are skipped until the interval has elapsed since the last completed sync. For entity syncs, values at or below about 4 hours behave like Automatic; only the 6-hour, 12-hour, daily, and weekly settings genuinely throttle.
How formatting translates to ServiceNow
ServiceNow journal fields (comments and work notes) and description/close-notes fields render plain text only, so everything Serval writes into them is automatically converted from Serval’s rich formatting to clean plain text. This applies to the built-in two-way ticket sync for all three ServiceNow ticket types - incidents, catalog requested items, and HR cases - covering ticket descriptions on create and update, and message bodies posted as comments or work notes.| Serval formatting | What ServiceNow receives |
|---|---|
| Links and images | ”text (url)” - ServiceNow auto-linkifies bare URLs |
| Bullet and numbered lists | Normalized list lines beginning with ”- “ |
| Bold, italic, headings, code markers | Stripped, text preserved |
| @-mentions | Resolved to the user’s name |
How the connection works
Serval connects to one ServiceNow instance and acts as a single dedicated integration user. You pick one of two authentication methods when you connect:- OAuth 2.0 (Client Credentials) - the default and recommended option. On each request, Serval exchanges your Client ID and Client Secret for a short-lived bearer token from your instance’s token endpoint (
https://<instance>.service-now.com/oauth_token.do) and sends that token on every API call. ServiceNow runs those calls as the OAuth Application User you designate (the same dedicated integration user described below), so that user’s roles and table ACLs determine exactly what Serval can do. Serval does not request any OAuth scopes - the token is bounded entirely by the integration user’s permissions, not by a scope list. - Basic authentication - Serval stores the integration user’s username and password and sends them as standard HTTP Basic auth on every call. Use this when inbound OAuth client credentials aren’t available on your instance, or for a quick test setup.
service-now.com - requests to any other host are refused before they leave Serval. Data flows both ways: Serval polls your instance for ticket and comment changes, keeps groups, roles, departments, companies, locations, and cost centers current with scheduled background syncs, and writes back (creating and updating incidents, problems, change requests, HR cases, and catalog requests) on demand when a workflow runs.
Get your credentials
You configure everything on the ServiceNow side first, then paste two values into Serval. The authoritative provider reference is the ServiceNow product documentation; the exact clickpath for inbound OAuth is in ServiceNow’s official guide, Enable OAuth with inbound REST.Create a dedicated integration user
| Field | Value |
|---|---|
| User ID | serval.integration |
| First name | Serval |
| Last name | Integration |
| Active | Checked |
| Web service access only | Checked (blocks interactive login) |
| Internal Integration User | Checked (if available in your ServiceNow version) |
Create a custom role for Serval
itil or admin. (The simpler OOB-role alternative is covered in the next step.)| Field | Value |
|---|---|
| Name | x_serval_integration |
| Description | Custom role for Serval integration with least-privilege API access |
| Role | Purpose |
|---|---|
rest_api_explorer | Enables REST API access |
personalize_choices | Allows reading sys_choice values |
personalize_dictionary | Allows reading sys_dictionary for field definitions |
Grant table access via ACLs
com.snc.change_management.rest_api) - active by default on most instances.- Required Table Access
- Create ACLs
- Alternative: Use OOB Roles
Incident Management Tables
| Table | Read | Create | Write | Purpose |
|---|---|---|---|---|
incident | Yes | Yes | Yes | Incident records (all standard fields) |
sys_journal_field | Yes | - | - | Comments and work notes |
HR Service Delivery Tables
Required only if you sync or create HR cases.| Table | Read | Create | Write | Purpose |
|---|---|---|---|---|
sn_hr_core_case | Yes | Yes | Yes | HR case records, including comments and work notes |
Service Catalog Tables
| Table | Read | Create | Write | Purpose |
|---|---|---|---|---|
sc_cat_item | Yes | - | - | Catalog item details |
sc_category | Yes | - | - | Catalog categories |
sc_request | Yes | Yes | - | Service requests |
sc_req_item | Yes | Yes | Yes | Requested items |
item_option_new | Yes | - | - | Catalog item variable definitions |
io_set_item | Yes | - | - | Variable set to catalog item mapping |
question_choice | Yes | - | - | Choices for select-type catalog variables |
catalog_script_client | Yes | - | - | Catalog client scripts (fillability analysis, Understanding tab) |
catalog_ui_policy | Yes | - | - | Catalog UI policies (When/Show/Hide/Require rules) |
catalog_ui_policy_action | Yes | - | - | UI policy actions |
sys_script_include | Yes | - | - | Script includes referenced by catalog client scripts |
sys_attachment | - | Yes | - | File attachment uploads for requested items (written through the Attachment API, but the user still needs create permission) |
Configuration Tables (Read-Only)
| Table | Read | Create | Write | Purpose |
|---|---|---|---|---|
sys_user | Yes | - | - | User lookup for assignment |
sys_user_group | Yes | - | - | Assignment group lookup |
sys_choice | Yes | - | - | Field dropdown values |
sys_dictionary | Yes | - | - | Field definitions |
cmdb_ci_service | Yes | - | - | Business services |
Knowledge Base Tables (Read-Only)
| Table | Read | Create | Write | Purpose |
|---|---|---|---|---|
kb_knowledge_base | Yes | - | - | Knowledge base metadata |
kb_category | Yes | - | - | Knowledge categories |
kb_knowledge | Yes | - | - | Knowledge articles |
kb_article_template | Yes | - | - | Article template metadata (templated articles) |
kb_article_template_definition | Yes | - | - | Article template definitions; templated articles also read their extended template tables |
User Criteria Tables (Read-Only)
These tables determine which users have access to knowledge articles and catalog items, and back the user criteria import.| Table | Read | Create | Write | Purpose |
|---|---|---|---|---|
user_criteria | Yes | - | - | User criteria definitions (users, groups, companies, etc.) |
kb_uc_can_read_mtom | Yes | - | - | Knowledge article access - users who CAN read |
kb_uc_cannot_read_mtom | Yes | - | - | Knowledge article access - users who CANNOT read |
sc_cat_item_user_criteria_mtom | Yes | - | - | Catalog item access - users who CAN access |
sc_cat_item_user_criteria_no_mtom | Yes | - | - | Catalog item access - users who CANNOT access |
Change Management Tables
| Table | Read | Create | Write | Purpose |
|---|---|---|---|---|
change_request | Yes | Yes | Yes | Change request records |
sysapproval_approver | Yes | - | Yes | Change request approval records (write is needed to act on approvals) |
com.snc.change_management.rest_api) to be active on your ServiceNow instance. This plugin is active by default on most instances.Problem Management Tables
| Table | Read | Create | Write | Purpose |
|---|---|---|---|---|
problem | Yes | Yes | Yes | Problem records |
Access Management & Resource Sync Tables
These tables are required if you use Serval’s access profile capabilities for syncing organizational resources and provisioning/deprovisioning users.sys_user and sys_user_group tables listed above under Configuration Tables still require read access for basic functionality regardless.| Table | Read | Create | Write | Delete | Purpose |
|---|---|---|---|---|---|
sys_user | - | - | Yes | - | Write access for department assignment (read access already listed above) |
sys_user_grmember | Yes | Yes | - | Yes | Group membership provisioning and deprovisioning |
sys_user_role | Yes | - | - | - | Role definitions for resource sync |
sys_user_has_role | Yes | Yes | - | Yes | Role assignment provisioning and deprovisioning |
core_company | Yes | - | - | - | Company records for resource sync |
cmn_department | Yes | - | - | - | Department records for resource sync |
cmn_location | Yes | - | - | - | Location records for resource sync |
cmn_cost_center | Yes | - | - | - | Cost center records for resource sync |
Assign the custom role to the integration user
- Navigate to User Administration → Users and open the
serval.integrationuser - Scroll down to the Roles related list and click Edit
- Add the
x_serval_integrationrole (or the OOB roles if you chose that approach) - Click Save
(OAuth only) Enable the inbound client-credentials grant
sys_properties.list), find or create:| Field | Value |
|---|---|
| Name | glide.oauth.inbound.client.credential.grant_type.enabled |
| Type | true | false |
| Value | true |
| Application | Global |
(OAuth only) Create the OAuth Application Registry entry
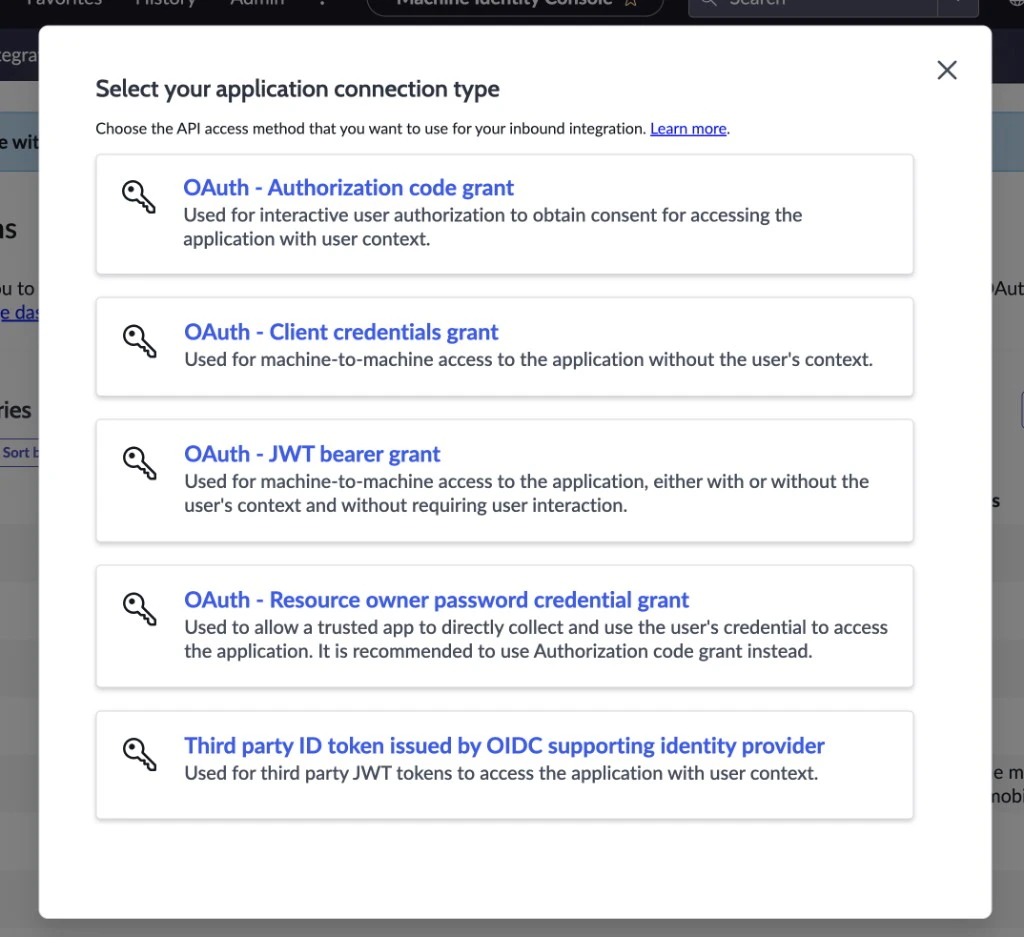
- Recommended: New Inbound Integration Experience - the current UI for inbound OAuth, including client credentials. When the wizard asks Select your application connection type, choose OAuth - Client credentials grant (machine-to-machine). Do not choose Authorization code, JWT bearer, Resource owner password, or third-party ID token flows for the Serval integration.
- Alternative: [Deprecated UI] Create an OAuth API endpoint for external clients - the older wizard for the same kind of inbound app. “Deprecated UI” refers to ServiceNow replacing the screen flow, not to the credentials; it still produces a working Client ID / Client Secret. Some teams see odd default forms here (for example, the OAuth Application User field hidden until you change the form layout); using the New Inbound Integration Experience often avoids that.
Serval integration) and save; ServiceNow auto-generates the Client Secret. Then:- Set Client type to run API calls as your integration account - for example Integration as a Service (wording varies by release). That tells ServiceNow which
sys_usersupplies roles, ACLs, and audit fields for requests made with a client-credentials token. - Allow the Client credentials grant. Often this is not on the main form: open the OAuth Entity or OAuth Entity Profile related list on the same Application Registry record, open the related row, and confirm Client credentials is enabled. Save that record if you changed it.
- Set the OAuth Application User to your
serval.integrationuser, so issued tokens act as that account.
(OAuth only) Copy the Client ID and Client Secret
Connect in Serval
In Serval, open Apps → ServiceNow → Connect and complete the form. The fields that appear depend on the Authentication method you pick.Enter your Instance Name
https://mycompany.service-now.com, enter mycompany.Choose the authentication method and fill in credentials
- OAuth 2.0 (recommended)
- Basic authentication
| Field | What to paste |
|---|---|
| Client ID | The Client ID from your ServiceNow OAuth application. |
| Client Secret | The Client Secret from the same OAuth application. |
Verifying the connection
Open the ServiceNow app’s API Integration tab and run the health checks. They confirm Serval can authenticate as your integration user and exercise the real surfaces it uses:- Test ServiceNow Connection - authenticates and queries your user table (a single row). Success reads “Successfully authenticated with ServiceNow”. Failure reads “Unable to connect to ServiceNow. Please verify your credentials are valid and have the necessary permissions.”
- List ServiceNow Users - samples up to ten rows from
sys_user. Success reports the sample size; failure reads “Unable to list users from ServiceNow. Please verify the credentials have permission to read the sys_user table.” - List ServiceNow Incidents, List ServiceNow Knowledge Articles, List ServiceNow Catalog Items, and List ServiceNow User Criteria - the same ten-row sample pattern against
incident,kb_knowledge,sc_cat_item, anduser_criteria. Each failure message names the table the credentials couldn’t read.
serval.integration user, creates a temporary incident whose short description begins with “Health Check Test Incident”, drives it through state transitions (New → In Progress → On Hold with a hold reason → In Progress), resolves it, creates additional short-lived incidents to exercise impact/urgency permutations (all resolved afterwards), and places a test catalog request against your first active catalog item, then closes the requested item. Test incidents are resolved, not deleted - seeing “Health Check Test” records appear and resolve is expected. The resolution-codes check fails if your instance has no resolution codes defined. The user lookup is hard-coded to the serval.integration user name - if you chose a different User ID in Get your credentials, this check fails at the user-lookup step even though the connection itself is healthy.Gotchas and troubleshooting
OAuth fails with access_denied / server_error
OAuth fails with access_denied / server_error
oauth_token.do - not a Serval storage problem. Work through these on the ServiceNow side, most common first:- Inbound client credentials enabled -
glide.oauth.inbound.client.credential.grant_type.enabledmust betruein Global scope. This is the number-one cause. - OAuth Application User set - the app must be tied to your integration user, and that user must be Active with the right roles/ACLs.
- Client credentials grant allowed - confirm it’s enabled on the app (or its OAuth Entity / Entity Profile record).
- Client ID / Secret correct - re-copy from ServiceNow with no leading or trailing spaces. If you rotated the secret in ServiceNow, update the Serval connection too.
The integration user doesn't appear in the OAuth Application User picker
The integration user doesn't appear in the OAuth Application User picker
Instance Name was rejected
Instance Name was rejected
mycompany (or paste the full URL and let Serval trim it) - don’t enter an IP, a non-service-now.com host, or extra path segments that aren’t part of the subdomain.'Required' validation errors when saving credentials
'Required' validation errors when saving credentials
- OAuth: “Client ID and Client Secret are required for OAuth 2.0” (or “Client ID and Client Secret are required when switching to OAuth 2.0” if you changed methods).
- Basic: “Username and Password are required for Basic Auth” (or “Username and Password are required when switching to Basic Auth”).
A write 'succeeds' (200) but the field didn't change
A write 'succeeds' (200) but the field didn't change
close_code, category, priority) silently ignore invalid values - the API returns 200 but the field stays empty, and a downstream Data Policy then blocks the state change. Valid choice values are instance-specific, so Serval’s helpers and workflows query them rather than hard-coding. If a workflow write isn’t sticking, the usual cause is an instance Business Rule, write ACL, or Data Policy on the target table - those are configured in ServiceNow and can’t be worked around from Serval.Change requests won't create or transition state
Change requests won't create or transition state
com.snc.change_management.rest_api) active. Most state transitions also require an assignment group to be set - set it at creation time, since adding it later is often blocked. Change approvals live in a separate table (sysapproval_approver), so the integration user needs write access there for approval workflows to work. A 403 from the Change Management API usually means a state-model condition isn’t met; a 400 naming a rule means a Business Rule is blocking.Knowledge, catalog, or access-profile syncs come back empty
Knowledge, catalog, or access-profile syncs come back empty
kb_* tables; empty catalog → check the catalog definition tables; empty access profiles → check the user_criteria and organizational tables. The matching health check (knowledge articles, catalog items, user criteria) will name the table it couldn’t read.Catalog sync fails or imports nothing after setting a catalog filter
Catalog sync fails or imports nothing after setting a catalog filter
A configured sync frequency doesn't seem to take effect
A configured sync frequency doesn't seem to take effect
Mirrored knowledge documents can't be edited or moved in Serval
Mirrored knowledge documents can't be edited or moved in Serval
A catalog item only imports as a link
A catalog item only imports as a link
A user criterion imports with warnings, or grants more access than expected
A user criterion imports with warnings, or grants more access than expected
Custom workflow writes show literal formatting markers in ServiceNow
Custom workflow writes show literal formatting markers in ServiceNow
Basic auth works but you want to move to OAuth (or vice versa)
Basic auth works but you want to move to OAuth (or vice versa)
Real-time comment sync via webhook (optional)
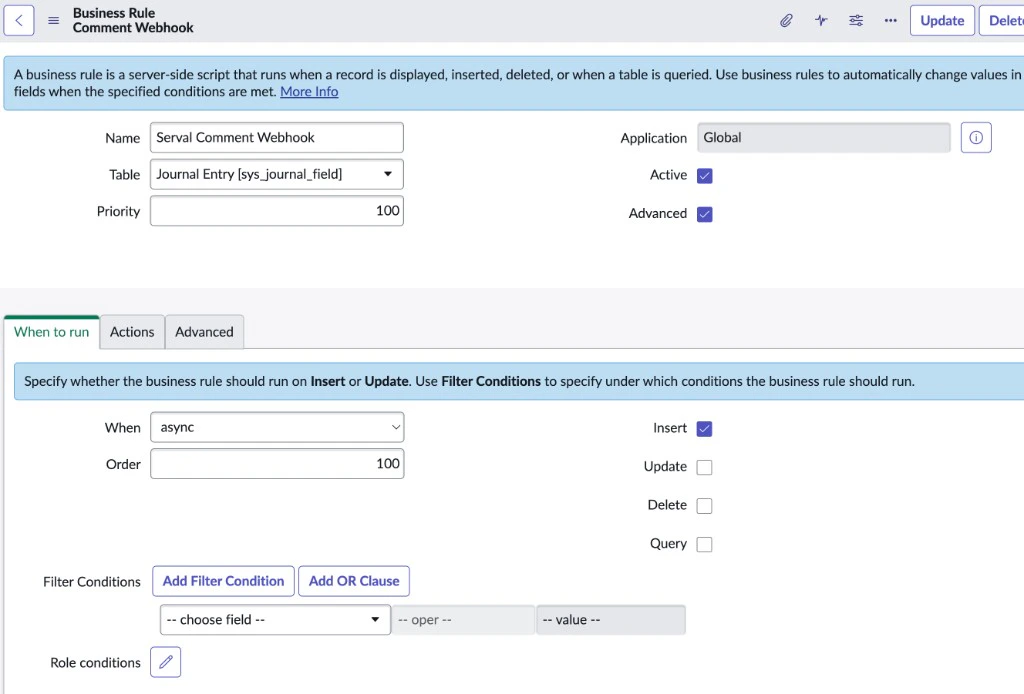
By default, Serval polls your ServiceNow instance to sync comments. For faster, near-instant comment delivery, you can configure a Business Rule that pushes new comments to Serval via webhook. This applies to comments on Incidents, HR cases, and Catalog Requested Items that were created by the Serval integration.sys_journal_field table. No ServiceNow plugins, store apps, or additional licensing are required.How it works
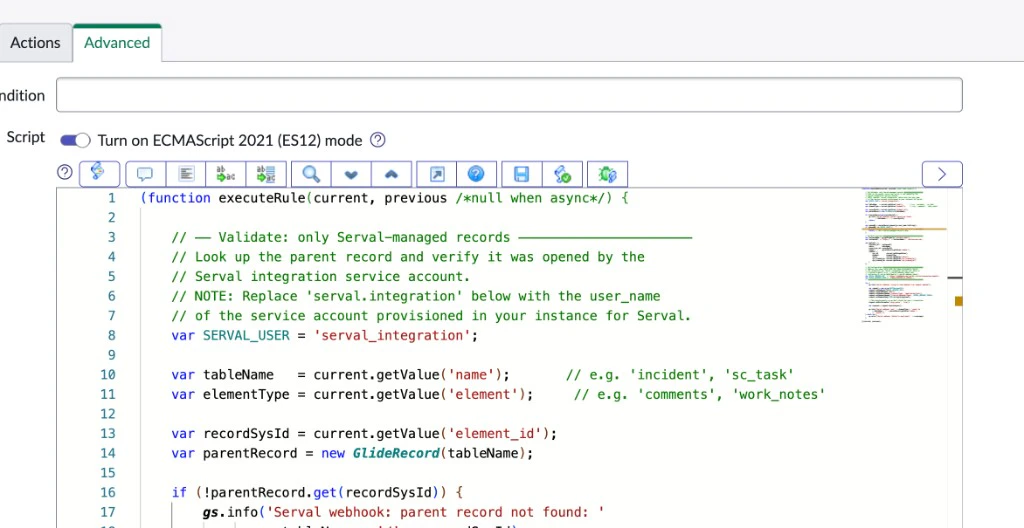
When a comment is added to a Serval-managed record, an async insert Business Rule fires on thesys_journal_field table. The rule verifies the parent record was opened by the Serval service account (the dedicated integration user you created in Get your credentials), constructs a JSON payload, and sends it asynchronously to the Serval webhook. Serval processes the event and delivers the comment to the relevant conversation in real time - entries on the comments field surface as public replies, entries on work_notes surface as internal notes.
incident, sn_hr_core_case, and sc_req_item records.Get your webhook token
The webhook carries a per-environment token that Serval provides during onboarding, sent in theX-Serval-Webhook-Token header (server-side verification of this token is on the roadmap; the token is forwarded with each event today). Contact support@serval.com to obtain your token before creating the Business Rule. For production, store it in a System Property (for example x_serval.webhook_token) rather than hard-coding it in the script.
Webhook endpoint
| Property | Value |
|---|---|
| URL | https://svwebhook.api.serval.com/servicenow/new-comment |
| Method | POST |
| Content-Type | application/json |
| Authentication | Token via X-Serval-Webhook-Token header |
Payload reference
Payload reference
record_sys_id, comment.sys_id, and a parseable instance_url are required; Serval routes the event to your integration install by the instance domain.| Field | Type | Description |
|---|---|---|
instance_url | string | Your ServiceNow instance URL |
table | string | Source table: incident, sn_hr_core_case, or sc_req_item |
record_sys_id | string | sys_id of the parent record |
number | string | Record number, e.g. INC0012345, HRC0001234, RITM0056789 |
comment.sys_id | string | sys_id of the journal entry |
comment.element | string | comments (public reply) or work_notes (internal note) |
comment.value | string | The comment body text |
comment.sys_created_by | string | user_name of the commenter (must be a ServiceNow user_name - Serval resolves it to attribute the comment) |
comment.sys_created_on | string | ServiceNow timestamp |
Create the Business Rule
Configure the rule settings
| Field | Value |
|---|---|
| Name | Serval - Sync Comment to Webhook |
| Table | sys_journal_field |
| Advanced | Checked |
| When | async |
| Insert | Checked |
| Update | Unchecked |
| Delete | Unchecked |
| Query | Unchecked |
Live agent handoff via VA Bot-to-Bot (optional)
Serval can hand a conversation off to a human ServiceNow agent mid-flow, then bridge the agent’s replies back into the Serval ticket so the user keeps chatting in their original surface (Slack, Teams, web, etc.). This rides on ServiceNow’s native Virtual Agent Bot-to-Bot APIs - there is no Serval-shipped update set and no Scripted REST API to install on your instance. Setup on the ServiceNow side is roughly: install the Virtual Agent API plugin (if not already installed), grant the Serval service account a few additional permissions, create a Token Verification + Message Auth + Provider Application + Outbound REST Message pointing at a Serval-hosted webhook URL, and (optionally) tune the AWA routing for the chat channel you want to use for the handoff.subtype = "interaction" on the existing ServiceNow integration - they do not create a separate integration or channel type. The auto-created interaction record on the ServiceNow side is the same record type ServiceNow uses for all VA-mediated chats.How the bridge works
The bridge has three legs:- Inbound to ServiceNow - Serval opens, sends messages on, and ends a Bot-to-Bot conversation by calling ServiceNow’s Virtual Agent Bot Integration endpoint (installed by the Virtual Agent API plugin). The action discriminator travels in the request body:
START_CONVERSATION,AGENT_CHAT, orEND_CONVERSATION. - Outbound from ServiceNow - when the live agent types a reply, ServiceNow’s Provider Application looks up its associated Outbound REST Message and POSTs the response to the URL you configured there. That URL is the Serval-hosted webhook.
- Agent presence pre-flight (optional) - Serval’s availability check reads the
awa_agent_presence_capacitytable to know whether any agents are currently online before starting a handoff.
channelIdon the start action - maps to a ServiceNowsys_cs_channelrecord. Defaults to"chat". The channel record’s “Bot to Bot Synchronous” flag and its AWA queue assignment together determine where the conversation routes.contextVariableson the start action - a free-form key/value bag passed to ServiceNow on every turn. Customers configure their AWA routing rule against the variable name(s) of their choice (e.g.u_liveagent_optional_skills). See Customize routing with context variables below.
Prerequisites
- Virtual Agent + Virtual Agent API plugins installed on your ServiceNow instance (Quebec or later).
- The Serval ServiceNow integration must already be connected (everything above on this page).
- Now Assist Pro licensing is not required - Bot-to-Bot is part of the base Virtual Agent API plugin.
Limitations (read before you commit)
- Closing a Serval ticket does not automatically end the ServiceNow conversation. Your workflow should call the end-session action when the ticket resolves if you want symmetric cleanup. The conversation eventually times out on the ServiceNow side either way.
- Agent attribution is automatic; assignment details are not. ServiceNow’s Bot-to-Bot payloads carry per-message agent information, and Serval resolves it to the ServiceNow user - so agent replies are attributed correctly on the Serval ticket with no extra work. What the asynchronous START acknowledgment does not tell you is which queue the conversation landed in or when an agent picked up; poll the auto-created
interactionrecord’sassigned_tofield from a workflow if you need that - see the example workflow below. - Inbound auth verification is currently advisory. The Basic-auth password on inbound webhooks is forwarded onto the event for downstream verification, but the constant-time check against the rotated token is not yet enforced server-side. The per-install webhook URL contains an unguessable UUID, which is the practical access control today. Treat the rotated token as a not-yet-load-bearing secret in the meantime - full server-side verification is on the roadmap.
- Attachments require trusted-media-domain configuration. Files do cross the bridge in both directions, but ServiceNow refuses to download attachments from URLs whose host isn’t listed under the active Provider Application record’s Trusted media domains (the
sys_cs_provider_applicationrecord - labeled Provider Channel Identity on some releases). You must add Serval’s S3 attachment host (the host of the presigned URL Serval sends for attachments - visible on a test egress) to that list, otherwise the live agent will see “We couldn’t download your file using the specified URL” instead of the image. See the ServiceNow docs: Set up trusted media domains for secure file upload for the field and ACL setup.
What agent replies look like on the Serval ticket
Three kinds of inbound items surface on the bridged ticket; everything else (topic pickers and other Virtual Agent scaffolding) is accepted and dropped:- Agent text surfaces as a comment, attributed to the ServiceNow agent.
- Agent images and files surface as attachments. Serval downloads them from ServiceNow’s conversational media API using your stored integration credentials, capped at 50 MB per file. If a download fails, Serval posts the placeholder comment
[attachment <name> could not be downloaded - please refresh ServiceNow Agent Workspace]instead of failing the whole message. - System prompts (such as AWA idle-timeout warnings) surface as comments so the user can reply and keep the chat alive.
Step 1: Grant additional permissions to the Serval service account
The standard Serval ACLs cover the Table API surface used by the rest of the integration. Live Agent needs two additional ServiceNow roles plus reads on the AWA tables and theinteraction table. Add these to your Serval service-account user:
Roles:
| Role | Why |
|---|---|
virtual_agent_admin | Required for ServiceNow’s Bot Integration endpoint to accept Serval’s Bot-to-Bot calls. |
interaction_agent | Lets Serval read the auto-created interaction record after START_CONVERSATION (for the optional assignment poll) and lets the inbound attachment-download path resolve the agent-supplied conversational-media URLs on image items. |
Type: record, Operation: read, Requires role: x_serval_integration or whichever role you assigned to the Serval service account):
| Table | Purpose |
|---|---|
awa_agent_presence_capacity | Used by the availability check. Without this, the check will report no agents available for everyone. |
awa_agent_presence | Used by AWA routing - presence_capacity is a view that joins this in. |
awa_agent_capacity | Same; joined by the presence_capacity view. |
interaction | Read access for the optional assigned_to poll. Already covered if you’re using the interaction_agent role above. |
Step 2: Generate the shared bot token in Serval
In your Serval workspace, navigate to App Instances → ServiceNow → Ticket Sync settings. Scroll to the Live Agent (VA Bot-to-Bot) section and click Generate token. You’ll see three values you’ll need in the next step:| Value | What it is |
|---|---|
| Inbound Webhook URL | Serval-hosted URL the ServiceNow Outbound REST Message will POST agent replies to. Per-install - contains an unguessable UUID - so do not share between environments. |
| Authentication Username | serval by convention. Any username is accepted - the password (the token below) is the authenticator, and it must be non-empty. |
| Authentication Token | One-time-displayed opaque secret - copy it now, you cannot view it again. Click Rotate token later if you ever need a new one (rotation invalidates the previous value immediately). |
- The Token Verification record. Serval injects this value into the body of every Bot-to-Bot call; ServiceNow’s Message Auth middleware verifies it before processing.
- The Outbound REST Message Basic-auth password. ServiceNow presents this value when posting agent replies to the Inbound Webhook URL above.
Step 3: Configure the four ServiceNow records that wire up Bot-to-Bot
ServiceNow’s Bot-to-Bot setup links four records together. The record names below are the OOB tables - the navigation labels may vary slightly by release.Enable inbound auth on the VA Bot Integration Scripted REST API
Create the Token Verification record
token_verification.list and press Enter. Click New. Fill in:| Field | Value |
|---|---|
| Name | Serval (or any human-readable name) |
| Token | The Authentication Token from Serval (from Step 2) |
Create the Message Auth record
message_auth.list and press Enter. Click New. Fill in:| Field | Value |
|---|---|
| Name | Serval Bot Auth |
| Provider | Serval (free-text; only used for organization) |
| Inbound Message Verification | Pick the Token Verification record from the previous step (Serval) |
| Outbound Message Creation | Pick the same Token Verification record |
Create the Provider Application
sys_cs_provider_application.list and press Enter. Click New. Fill in:| Field | Value |
|---|---|
| Name | Serval Bot |
| Inbound ID | serval (or any unique slug - this is the appInboundId value, only needed in multi-bot instances; single-bot instances can pick any value) |
| Message Auth | Pick the Message Auth record from the previous step (Serval Bot Auth) |
| Provider | VA Bot to Bot Provider |
Create the Outbound REST Message
REST Message and open the table. Click New. Fill in:| Field | Value |
|---|---|
| Name | Must exactly match the Provider Application name from the previous step (Serval Bot). ServiceNow finds the outbound endpoint by name lookup against the active Provider Application. |
| Endpoint | The Inbound Webhook URL from Serval (Step 2). |
| Authentication type | Basic |
| Use mutual authentication | unchecked |
| Basic auth profile | Create a new Basic Auth profile (or pick an existing one) with Username: serval and the Authentication Token from Step 2 as the password. |
post with:| Field | Value |
|---|---|
| HTTP method | POST |
| Endpoint | Same as the parent REST Message |
| HTTP Headers | Content-Type: application/json |
Verify the chat channel is Bot-to-Bot enabled
sys_cs_channel.list and press Enter. Find the channel you intend to route through (the OOB one is named chat - its sys_id is what you’ll pass as channelId from your workflows; the literal string "chat" also works on most releases).On the channel record, confirm Bot to Bot Synchronous = true. If it’s not, set it and save. Without this flag, the bot integration endpoint will reject START_CONVERSATION calls with a routing error.- The Token Verification record’s
Tokenfield. - The Basic Auth profile used by the Outbound REST Message (or, if you embedded the password directly on the REST Message, update it there).
Step 4: SDK building blocks
The ServiceNow SDK exposes five thin building-block actions for live agent. They are intentionally not orchestration helpers - live-agent flows vary enough between customer ServiceNow configurations (different chat experiences, custom AWA routing rules, renamed topics, varying trigger phrases for NLU) that workflow authors compose these directly rather than configure a single high-level wrapper:checkLiveAgentAvailability- pre-flight: are any human agents online right now? Reads the agent-presence capacity table and returns whether agents are available plus a queue-depth figure (the sum of agents’ remaining capacity). Skill-level filtering is intentionally not exposed - routing belongs to AWA.startLiveAgentSession- opens a conversation. The caller supplies the ServalticketId, the user (a ServiceNowsys_usersys_id is preferred, plus email), the verbatimmessagetext (including any NLU trigger phrase),channelId(defaults to"chat"),contextVariablesfor routing (re-sent on every turn), and optionallyappInboundIdfor multi-bot instances.connectTicketdefaults to true, which wires the ServiceNow conversation onto the Serval ticket as aninteraction-subtype external ticket so user replies auto-egress asAGENT_CHATturns. It returns the session identifiers - includingclientSessionIdand aliveAgentDatablob that the attach action below consumes.sendLiveAgentMessage- manually sends anAGENT_CHATturn. Usually not needed: once the ticket is connected, user replies auto-egress through the standard pipeline. Use it for programmatic messages (auto-replies, scripted status updates, testing).endLiveAgentSession- force-ends a session (e.g. on ticket resolve, user abandon, or SLA timeout).attachInteractionSysIdToLiveAgentSession- stashes a polledinteractionsys_id onto the Serval external ticket so the ticket-channels surface in the Serval UI renders a deep link to the chat in ServiceNow Agent Workspace.
Step 5: Customize routing with context variables
contextVariables is the principal knob for AWA routing. The variable names you pass are customer-specific - they must match the conditions on whichever AWA routing rule you’ve configured on your ServiceNow instance.
For example, an “IT Live Agent Chat” queue whose routing rule has the condition context.u_liveagent_optional_skills = IT is targeted by passing a u_liveagent_optional_skills context variable with the value IT. Other instances might use u_skill_required, routing_skill, or any other custom variable name. To find the right variable name on your instance, check your AWA routing rule’s condition script, or ask your ServiceNow admin.
Custom interaction-record fields (e.g. CMDB tag, custom assignment-group overrides, region routing) can also be projected onto the auto-created interaction record via a ServiceNow-side Business Rule that reads the contextVariables payload. This is a pure ServiceNow-side customization - no Serval changes required.
Step 6: Example workflow - START_CONVERSATION with routing and assignment poll
This mirrors the canonical pattern verified end-to-end against a real ServiceNow instance. You can drop this into a Serval workflow as a starting point and adapt the routing skills, trigger phrase, and message composition to your environment.- User → agent: any new message the user sends in their original surface fans out to the ServiceNow agent automatically as an
AGENT_CHATturn - no extra workflow code required; Serval’s ticket-channel egress handles it. - Agent → user: ServiceNow’s Outbound REST Message posts the agent’s typed reply to the Inbound Webhook URL configured in Step 3. Serval ingresses it as a comment on the bridged ticket (attributed to the agent), which surfaces back in the user’s original surface.
Step 7: Optionally end the session symmetrically
When the Serval ticket auto-resolves or the user abandons, callendLiveAgentSession with the clientSessionId saved from the START workflow output, the same user, a short reason such as ticket_resolved, and the same channelId (and contextVariables, if your routing rule expects them on every turn).
This is best-effort - the ServiceNow side eventually times the conversation out either way, but an explicit END_CONVERSATION cleans up the interaction record faster and gives the agent a clean “user ended chat” signal.
Step 8: Real-time translation (optional)
Live agents and end users frequently speak different languages - a Spanish-speaking employee opens a chat in Slack, the routed IT queue is staffed by English-speaking agents, and you want both sides to read their own language without the agent having to copy/paste into a translation tool. To enable bidirectional real-time translation for the lifetime of a conversation, pass two extra fields onstartLiveAgentSession: userLanguage (a BCP-47 code for the requester, e.g. es) and agentLanguage (the code your live agents read and write, e.g. en).
What changes after that:
- User → agent. Every message the user types on the upstream surface is translated from
userLanguageintoagentLanguagebefore it lands as anAGENT_CHATturn on ServiceNow. - Agent → user. Every reply the live agent posts is translated from
agentLanguageintouserLanguagebefore it’s persisted on the Serval ticket and fanned back out to the user’s surface.
- Both fields must be set. If either is omitted, or both share a primary subtag (e.g.
envsen-US), the conversation runs through verbatim - no translation is attempted. - URLs, code blocks, ticket numbers, and @mentions are preserved verbatim across the translation.
- Translation failures fall back to the original text and log a warning. A passthrough turn is strictly better than a dropped turn on a live chat - the agent or user can ask the other side to rephrase.
- Translation is handled by Serval automatically - there is nothing to configure on the ServiceNow side.
userLanguage. If userLanguage is unknown, no translation is attempted in either direction.
Need help? Contact support@serval.com for assistance with your ServiceNow integration - including custom routing-rule design, multi-bot Provider Application setups, interaction-field Business Rules, and real-time translation rollouts.