> ## Documentation Index
> Fetch the complete documentation index at: https://docs.serval.com/llms.txt
> Use this file to discover all available pages before exploring further.

# Build Your First Workflow

> Build and publish a workflow in minutes using natural language

export const ZoomVideo = ({webm, mp4, alt}) => {
  const [open, setOpen] = React.useState(false);
  React.useEffect(() => {
    if (!open) return;
    const onKey = e => {
      if (e.key === 'Escape') setOpen(false);
    };
    document.addEventListener('keydown', onKey);
    const prevOverflow = document.body.style.overflow;
    document.body.style.overflow = 'hidden';
    return () => {
      document.removeEventListener('keydown', onKey);
      document.body.style.overflow = prevOverflow;
    };
  }, [open]);
  return <>
      <video autoPlay loop muted playsInline onClick={() => setOpen(true)} aria-label={alt} style={{
    width: '100%',
    borderRadius: '0.5rem',
    cursor: 'zoom-in',
    display: 'block'
  }}>
        {webm && <source src={webm} type="video/webm" />}
        {mp4 && <source src={mp4} type="video/mp4" />}
      </video>
      {open && <div onClick={() => setOpen(false)} role="dialog" aria-modal="true" aria-label={alt} style={{
    position: 'fixed',
    inset: 0,
    background: 'rgba(0, 0, 0, 0.85)',
    zIndex: 9999,
    display: 'flex',
    alignItems: 'center',
    justifyContent: 'center',
    cursor: 'zoom-out',
    padding: '2rem'
  }}>
          <video autoPlay loop playsInline controls onClick={e => e.stopPropagation()} style={{
    maxWidth: '95vw',
    maxHeight: '95vh',
    borderRadius: '0.5rem',
    boxShadow: '0 25px 50px -12px rgba(0, 0, 0, 0.5)',
    cursor: 'default'
  }}>
            {webm && <source src={webm} type="video/webm" />}
            {mp4 && <source src={mp4} type="video/mp4" />}
          </video>
          <button onClick={() => setOpen(false)} aria-label="Close" style={{
    position: 'fixed',
    top: '1rem',
    right: '1rem',
    width: '2.5rem',
    height: '2.5rem',
    borderRadius: '9999px',
    background: 'rgba(255, 255, 255, 0.1)',
    border: '1px solid rgba(255, 255, 255, 0.2)',
    color: 'white',
    fontSize: '1.25rem',
    cursor: 'pointer',
    display: 'flex',
    alignItems: 'center',
    justifyContent: 'center'
  }}>
            ×
          </button>
        </div>}
    </>;
};

This guide walks you through creating, testing, and publishing your first workflow. By the end, you'll have a working automation ready to run.

## Before You Start

* Navigate to your team in the left panel
* Select the **Workflows** tab

***

## Create Your First Workflow

<Steps>
  <Step title="Start a new workflow">
    Click **New Workflow** in the top right corner. Choose a workflow type or let Serval decide based on your description

    <Frame caption="Navigate to workflows and click New Workflow">
      <ZoomVideo webm="/images/docs_navigatetoworkflows.webm" mp4="/images/docs_navigatetoworkflows.mp4" alt="Navigating to the workflows section and clicking New Workflow button" />
    </Frame>
  </Step>

  <Step title="Describe what you want">
    Tell Serval what you want to automate in plain language. Be specific about:

    * **What** the workflow should do
    * **When** it should run (if not manual)
    * **Which apps** it should connect to

    The workflow builder will ask follow-up questions if it needs clarification.

    **Example prompts:**

    * "Reset a user's password in Okta and send them a Slack DM with instructions"
    * "Every Monday at 9am, list open tickets older than 7 days and post to #it-ops"
    * "When a user is added to the Engineering group in Okta, add them to the engineering GitHub team"

          <Frame caption="Describe your workflow in natural language">
            <ZoomVideo webm="/images/docs_startworkflow.webm" mp4="/images/docs_startworkflow.mp4" alt="Typing a workflow description and Serval building the workflow" />
          </Frame>
  </Step>

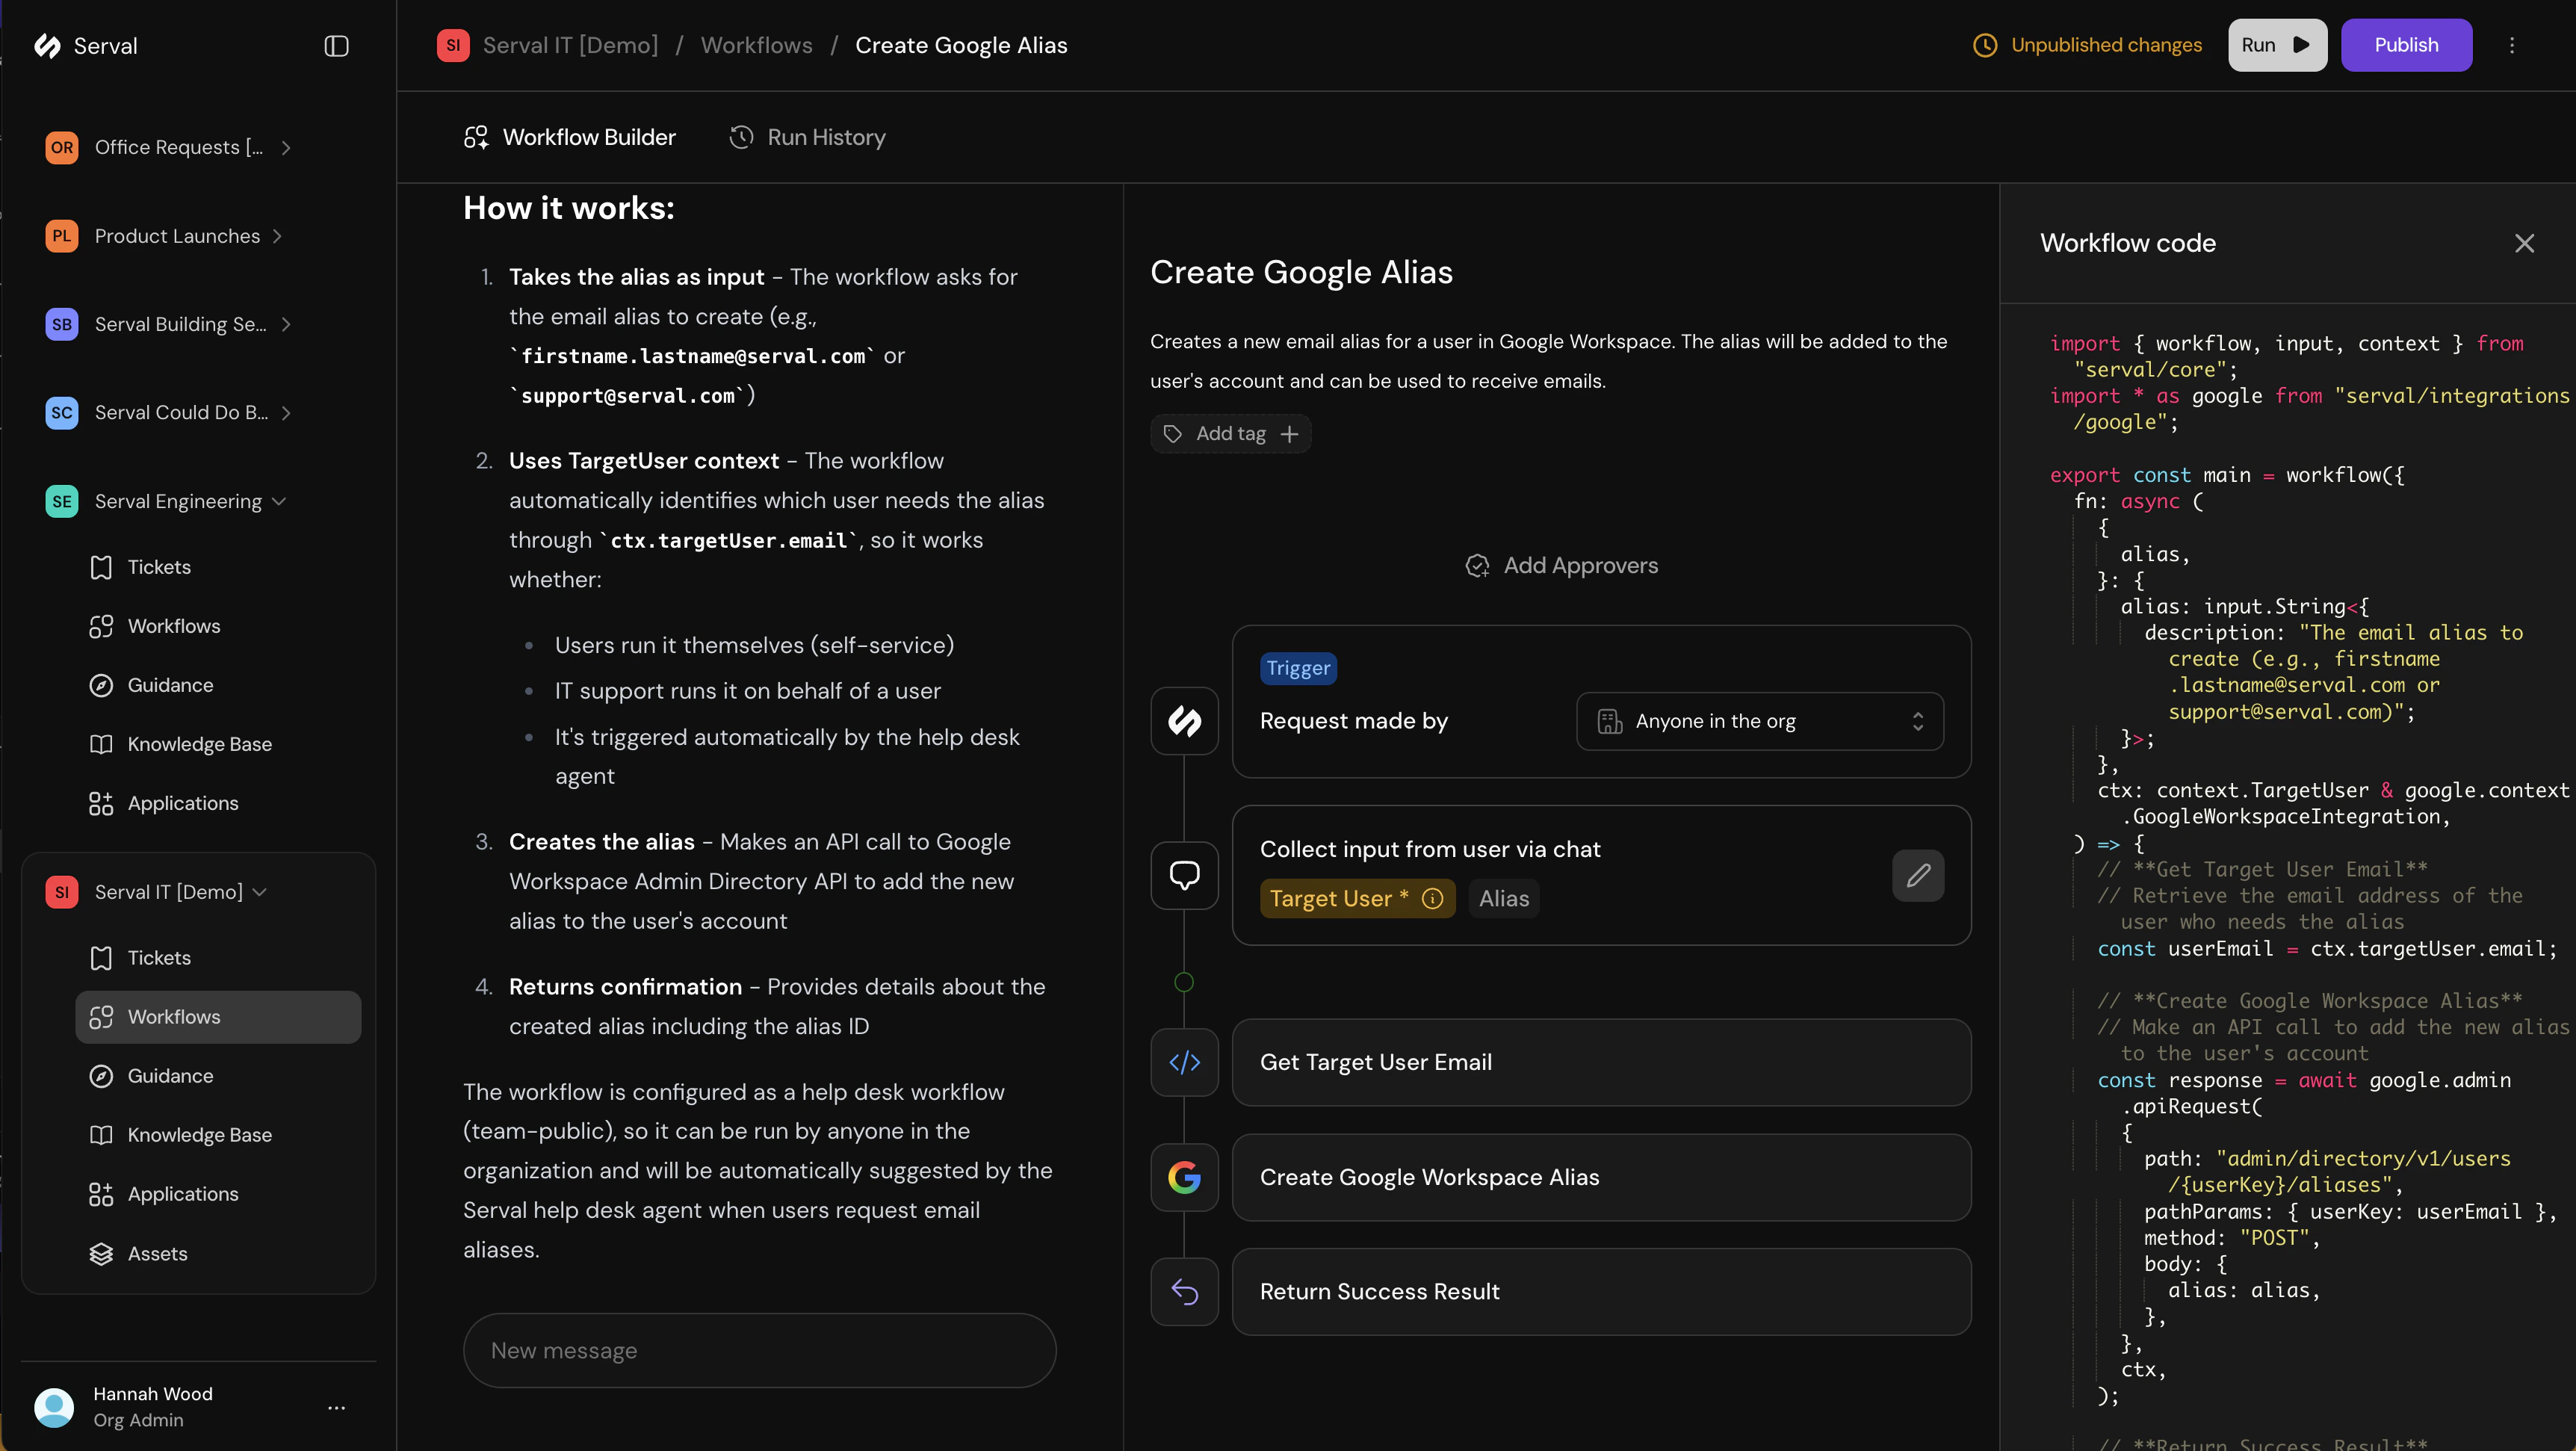
  <Step title="Review the generated workflow">
    Watch as Serval builds your workflow in real-time. When complete, you'll see:

    * A visual diagram of each step
    * The generated code (editable if needed)
    * A summary of what the workflow does

    Request changes by typing in the chat: "Add an approval step before resetting the password" or "Also send a confirmation email."

    <Frame caption="Review the generated workflow code and diagram">
      <img src="https://mintcdn.com/serval/1MkNvweOjUDMFgE8/images/docs_builtworklfowwcode.png?fit=max&auto=format&n=1MkNvweOjUDMFgE8&q=85&s=be2e52606b805c0bf4d2fb797ac08439" alt="Workflow builder showing generated code and visual diagram" style={{ width:"100%" }} width="3448" height="1942" data-path="images/docs_builtworklfowwcode.png" />
    </Frame>
  </Step>

  <Step title="Test your workflow">
    Click **Run** to test the workflow before publishing. The run panel shows:

    * Each step's execution status
    * Input/output data at each step
    * Any errors with details

    <Frame caption="Test your workflow before publishing">
      <ZoomVideo webm="/images/docs_workflowrun.webm" mp4="/images/docs_workflowrun.mp4" alt="Running a workflow test and viewing execution results" />
    </Frame>
  </Step>

  <Step title="Publish">
    Once testing confirms the workflow works correctly, click **Publish** to make it available.

    * Help desk workflows become available to the help desk agent immediately
    * Scheduled workflows start running on their configured schedule
    * Team-only workflows appear in your team's workflow list
  </Step>
</Steps>

***

## Configure Your Workflow

After creating a workflow, you can configure additional settings:

<CardGroup cols={2}>
  <Card title="Workflow Types" icon="bolt" href="/sections/documentation/workflows/Configure/types">
    Configure when workflows run: manually, on schedule, or via webhook
  </Card>

  <Card title="Approvals" icon="check-double" href="/sections/documentation/workflows/Configure/approvals">
    Require approval before sensitive workflows execute
  </Card>

  <Card title="Inputs" icon="keyboard" href="/sections/documentation/workflows/Configure/inputs">
    Collect information from users before the workflow runs
  </Card>

  <Card title="Execution Scope" icon="users" href="/sections/documentation/workflows/Configure/execution-scope">
    Control who can run the workflow: org-wide or team-only
  </Card>
</CardGroup>

***

## Tips for Better Workflows

<CardGroup cols={3}>
  <Card title="Be specific" icon="bullseye">
    "Reset Okta password" works better than "help with access"
  </Card>

  <Card title="Name your apps" icon="plug">
    Mention which integrations to use: "in Slack," "via GitHub," "using Okta"
  </Card>

  <Card title="Iterate" icon="arrows-rotate">
    Start simple, test, then add complexity through follow-up prompts
  </Card>
</CardGroup>
